fastlane 真是相见恨晚。其实在好久前就 star 过 这个项目,但 star 就是 star,star 完就该干嘛就干嘛去了,像朋友推荐了一本书,买来从未翻过。

好,废话少说,进入正题,fastlane 是个什么东东呢?

fastlane is a tool for iOS, Mac, and Android developers to automate tedious tasks like generating screenshots, dealing with provisioning profiles, and releasing your application.

自动帮我们构建 App,然后发布 App。拿 iOS 应用来说,就是打包 App,发布 App 到 App Store。对,没错,自动帮我们提交 App 到 App Store。想想原先发布 App 都纯手工打造,浪费人力物力,现在点一个按钮就可以搞定,爽不爽?就在前些天继 fabric 后,fastlane 也被 Google 收购啦!

安装

fastlane 是 ruby 脚本,确定 ruby 版本,要高于 2.0 版本:

1
$ ruby -v

首先需要安装最新版本的 Xcode 命令行工具:

1
$ xcode-select --install

安装 fastlane:

1
$ sudo gem install -n /usr/local/bin fastlane

查看 fastlane 版本:

1
$ fastlane --version

为项目配置 fastlane

1
2
$ cd 项目
$ fastlane init

fastlane init 会询问你的 Apple ID (itunes connect 登录邮箱)及 itunes connect 密码。帮你生成 fastlane 文件夹,包含文件如下:

1
2
3
4
5
6
7
8
9
10
11
12
13
14
15
16
17
18
19
20
21
22
23
24
25
26
27
28
29
30
31
.
├── Appfile
├── Deliverfile
├── Fastfile
├── metadata
│   ├── app_icon.png
│   ├── copyright.txt
│   ├── en-US
│   │   ├── description.txt
│   │   ├── keywords.txt
│   │   ├── marketing_url.txt
│   │   ├── name.txt
│   │   ├── privacy_url.txt
│   │   ├── release_notes.txt
│   │   └── support_url.txt
│   ├── primary_category.txt
│   ├── primary_first_sub_category.txt
│   ├── primary_second_sub_category.txt
│   ├── secondary_category.txt
│   ├── secondary_first_sub_category.txt
│   ├── secondary_second_sub_category.txt
│   └── zh-Hans
│   ├── description.txt
│   ├── keywords.txt
│   ├── marketing_url.txt
│   ├── name.txt
│   ├── privacy_url.txt
│   ├── release_notes.txt
│   └── support_url.txt
└── screenshots
└── README.txt

Appfile 文件

包含:

  • App Bundle ID
  • Itunes Connect 邮箱
  • Team ID
1
2
3
4
app_identifier "com.test.test" # The bundle identifier of your app
apple_id "test@test.com" # Your Apple email address
team_id "T8E8S8T88" # Developer Portal Team ID

Deliverfile

配置 Itunes Connect 中应用信息,比如 App 关键字、隐私 URL、App 介绍、版本更新介绍等。

metadata 文件夹里 和 Deliverfile 都可以配置 Itunes Connect 的数据,但后者优先级高。

也就是说,metadata 文件夹中 txt 文件的内容都可以写在 Deliverfile 里,而不用出现在 metadata 文件夹中。

Deliverfile 格式如下:

1
2
3
4
5
6
7
8
9
10
11
12
13
14
15
16
17
18
19
20
21
22
23
24
25
26
27
28
29
30
31
32
33
34
35
36
37
38
39
40
41
42
43
44
45
46
47
48
49
50
51
52
53
54
55
56
57
58
59
60
61
62
# App Bundle ID
app_identifier com.test.test
# Itunes Connect 邮箱
username test@test.com
# 应用名称
name({
'zh-Hans' => '测试应用-很牛X的应用'
})
# 应用描述
description({
'zh-Hans' => '这是一个测试应用'
})
# 关键词
keywords({
"zh-Hans" => "关键词1, 关键词2"
})
# 技术支持网址
surpport_url({
'zh-Hans' => 'http://www.surpporturl.com'
})
# 营销网址
marketing_url({
'zh-Hans' => 'http://www.marketingurl.com'
})
# 隐私政策网址
privacy_url({
'zh-Hans' => 'http://www.privacyurl.com'
})
# 版本描述
release_notes({
'zh-Hans' => '这次只是修复 bug 没有新功能'
})
# 版权
copyright "#{Time.now.year} Test Inc."
# 审核信息(审核所用的登录名 密码)
app_review_information(
first_name: "Felix",
last_name: "Krause",
phone_number: "+43 123123123",
email_address: "github@krausefx.com",
demo_user: "demoUser",
demo_password: "demoPass",
notes: "such notes, very text"
)
# 是否自动发布
automatic_release true

除了上面列出的,还有:

1.应用分级

1
app_rating_config_path "../rating_config.json"

You can set the app age ratings using deliver. You’ll have to create and store a JSON configuration file. Copy the template to your project folder and pass the path to the JSON file using the app_rating_config_path option.

The keys/values on the top allow values from 0-2, and the items on the bottom allow only 0 or 1. More information in the Reference.md.

2.应用分类 如 社交类下面的工具类

请参考 https://github.com/fastlane/fastlane/blob/master/deliver/Reference.md

3.提交的信息

什么是提交信息?当你提交 App 的时候,会出现下图,这就是我们说的提交信息:
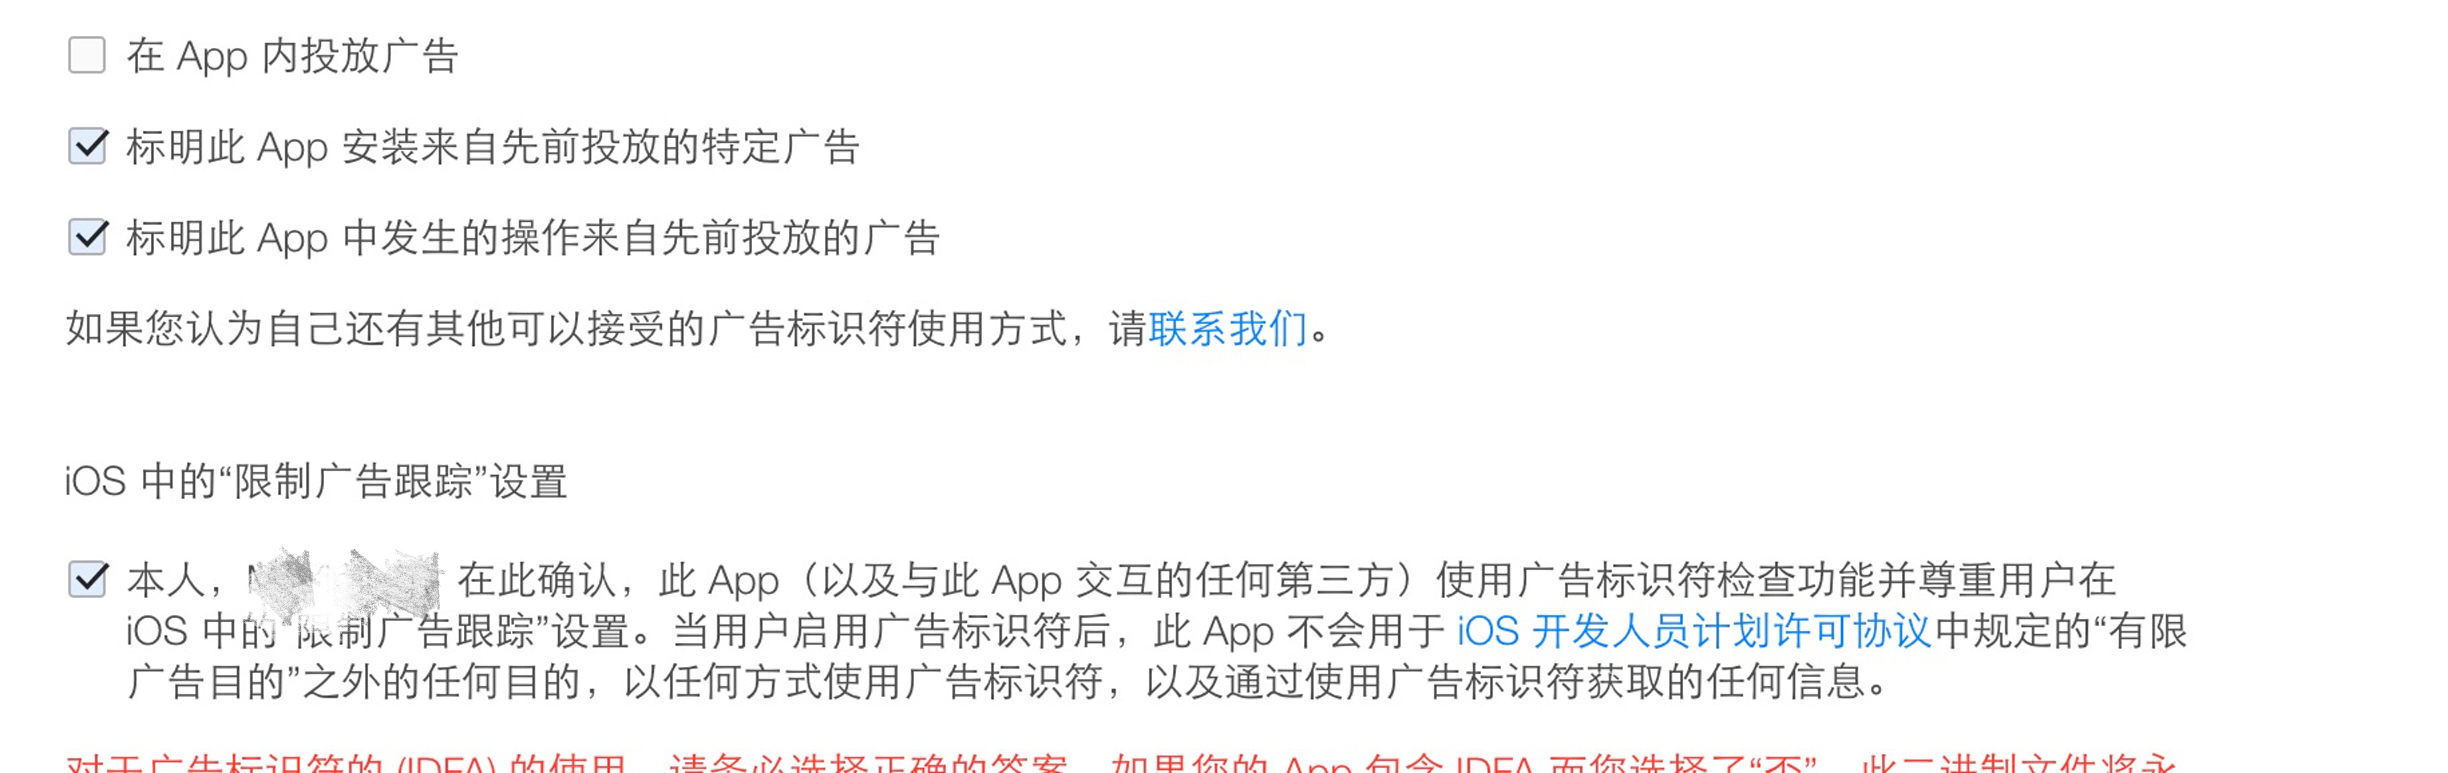
01

这个设置请参考:

https://github.com/fastlane/fastlane/blob/master/spaceship/lib/spaceship/tunes/app_submission.rb#L18-L69

我的设置是这样的:

1
2
3
4
5
6
7
8
submission_information: ({
export_compliance_encryption_updated: false,
add_id_info_uses_idfa: true,
add_id_info_serves_ads: false,
add_id_info_tracks_install: true,
add_id_info_tracks_action: true,
add_id_info_limits_tracking: true
})

更多内容请参考: https://github.com/fastlane/fastlane/blob/master/deliver/Deliverfile.md

Fastfile

fastfile 用来配置管理 lane。

格式如下:

1
2
3
4
5
6
7
8
9
10
11
12
13
14
15
16
17
18
19
20
21
22
23
24
25
26
27
28
fastlane_version "2.19.1"
default_platform :ios
platform :ios do
before_all do
# 开始
end
desc "发布 App 到 App Store"
lane :release do
cert
sigh
produce
gym
deliver
end
# You can define as many lanes as you want
after_all do |lane|
# 结束
end
error do |lane, exception|
# 错误
end
end

我们可以在 开始、结束、失败时执行一些脚本,用于配置、发消息提示开发者执行状态。

比如执行一段 shell:

1
sh ./msg.sh

重点介绍下 lane 的用法及内部命令。

1
2
3
4
5
6
7
8
9
10
11
12
desc "发布 App 到 App Store"
lane :release do
produce
cert
sigh
pem
snapshot
frameit
increment_build_number
gym
deliver
end
  • desc 用于介绍这个 lane是做什么用的
  • lane : 后面的 release 是这个 lane 的名字 执行这个 lane 时,可以直接使用 fastlane release

注:

increment_build_number 时如果出现错误:

There does not seem to be a CURRENT_PROJECT_VERSION key set for this project. Add this key to your target’s expert build settings.

请参阅:https://developer.apple.com/library/content/qa/qa1827/_index.html

重点介绍下里面的命令:

1.produce

Create new iOS apps on iTunes Connect and Dev Portal using the command line

在 iTunes Connect 里创建 App

2.cert

Automatically create and maintain iOS code signing certificates

使用证书创建私钥及签名

3.sign

Because you would rather spend your time building stuff than fighting provisioning

创建、更新、下载和修复 provisioning profiles,支持 App Store, Ad Hoc, Development 和企业 profiles

4.pem

Automatically generate and renew your push notification profiles

自动生成推送的 profiles 及 pem 文件

5.snapshot

Automate taking localized screenshots of your iOS and tvOS apps on every device

创建设备截图

6.frameit

Quickly put your screenshots into the right device frames

给截图加上边框

7.gym

Building your iOS apps has never been easier

生成 ipa 文件

8.deliver

Upload screenshots, metadata, and your app to the App Store

将截图、介绍信息、ipa 发送到 App Store

lane

  • 创建 App
  • 更新 App
  • Testflight 管理 Testflight 用户及上传至 Testflight

其他

简聊

1
2
3
4
5
6
msgTitle=$1
msgContent=$2
msgImageURL=$3
msgURL=$4
curl -d authorName=XXX -d title=${msgTitle} -d text=${msgContent} -d imageUrl=${msgImageURL} -d redirectUrl=${msgURL} https://jianliao.com/v2/services/webhook/xxx

在 lane 执行前可以执行消息提示:

1
2
3
4
platform :ios do
before_all do
sh "./jianliao.sh '标题:开始构建' '内容:我开始构建我的项目' 'http://iyiming.me/favicon.jpg' 'redirectUrl'"
end

完成、失败时类似。

蒲公英

打包成功后可以发送至 蒲公英:

1
curl -F "file=@XXX.ipa" -F "uKey=XXXX" -F "_api_key=XXX" -F "installType=2" -F "password=XXX" http://www.pgyer.com/apiv1/app/upload