iOS 7 添加了转场动画,让我们更加方便的切换控制器。iOS 7 SDK 支持两种自定义过渡:
怎么来区分自定义视图控制器过渡和交互式试图控制器过渡呢?
当过渡是时间的函数式,它通常是一个自定义视图控制器过渡
如果他是一个手势识别器或者其他类似事件的函数,它通常是一个交互式视图控制器过渡
比如:UINavigationController 过渡使我们最常见的自定义视图控制器过渡。UIPageViewController 过渡不是随着时间进行,它需要跟随我们的手指滑动,所以它是一种交互式视图控制器过渡。
自定义视图控制器过渡
实现自定义视图控制器过渡有两种方式:
使用 Storyboard 来实现自定义视图控制器过渡
我们可以使用连线( segue )的方式,来实现自定义视图控制器过渡,segue 有好几种类型,
选择某个 segue,我们可以看到下图:
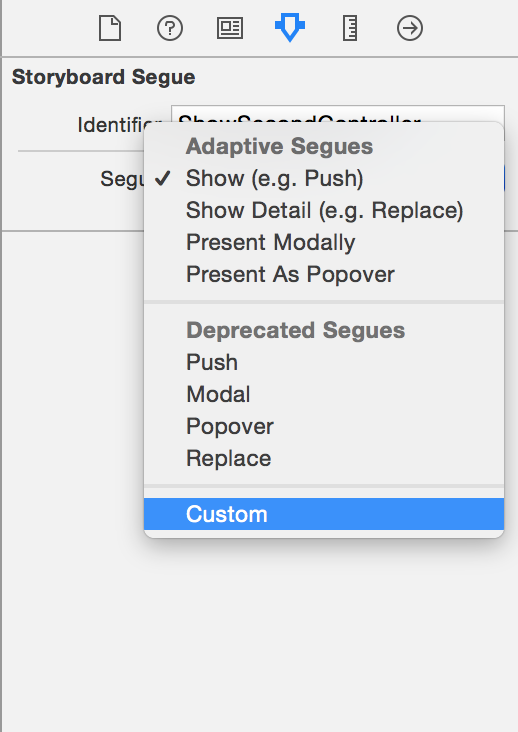
我们选择自定义这种方式可以看到:

我们可以指定 segue Class 它是一个 UIStoryboardSegue 子类,我们可以创建一个 UIStoryboardSegue 子类 IYMCustomSegue,填写在这里。
在 UIStoryboardSegue 里有个 perform 方法,我们在 IYMCustomSegue 重写一下:
1 2 3 4
| - (void)perfrom{ ... }
|
下面实现一个自定义 push 动画:
1 2 3 4 5 6 7 8 9 10 11 12 13 14 15 16 17 18 19 20 21
| - (void)perform { UIViewController *sourceViewController = self.sourceViewController; UIViewController *desinationViewController = self.destinationViewController; CGRect sourceRect = sourceViewController.view.frame; CGRect desinationViewFromRect = CGRectMake(sourceRect.origin.x + sourceRect.size.width, sourceRect.origin.y, sourceRect.size.width, sourceRect.size.height); desinationViewController.view.frame = desinationViewFromRect; desinationViewController.view.alpha = 0; [sourceViewController.view.superview addSubview:desinationViewController.view]; [UIView animateWithDuration:0.3 animations:^{ sourceViewController.view.alpha = 0.5; desinationViewController.view.alpha = 1; desinationViewController.view.frame = sourceRect; } completion:^(BOOL finished) { sourceViewController.view.alpha = 1; [desinationViewController.view removeFromSuperview]; [sourceViewController.navigationController pushViewController:desinationViewController animated:NO]; }]; }
|
代码方式实现
自定义试图控制器过渡是由两个协议实现的,即UIViewControllerTransitioningDelegate 和 UIViewControllerAnimatedTransitioning。
我们从 A 控制器到 B 控制器,通常有两种方式:
presentViewController 方式pushViewController 方式
使用 presentViewController 方式:从 A 控制器 present 到 B 控制器
- 设置 B 控制器的
transitionDelegate 为 A 控制器
- 在 A 控制器中实现
UIViewControllerTransitioningDelegate 协议
- 实现
UIViewControllerAnimatedTransitioning
实现 UIViewControllerTransitioningDelegate 中的方法:
1 2 3
| - (id <UIViewControllerAnimatedTransitioning>)animationControllerForPresentedController:(UIViewController *)presented presentingController:(UIViewController *)presenting sourceController:(UIViewController *)source; - (id <UIViewControllerAnimatedTransitioning>)animationControllerForDismissedController:(UIViewController *)dismissed;
|
这两个方法返回的是一个实现了 UIViewControllerAnimatedTransitioning 协议的类实例。通过方法名字我们就可以看到它们适用于 presentViewController 方式。如果自定义过渡效果只有一个视图控制器使用,视图控制器本身就可以实现UIViewControllerAnimatedTransitioning 协议,否则,就需要一个单独的继承自NSObject 一个单独的类来实现 UIViewControllerAnimatedTransitioning 协议。
这里我们就实现一个 B 视图控制器过渡动画,就直接在 A 控制器中实现UIViewControllerAnimatedTransitioning。
实现 UIViewControllerTransitioningDelegate 中的方法:
1 2 3 4 5 6 7 8 9 10 11 12 13 14
| - (NSTimeInterval)transitionDuration:(id <UIViewControllerContextTransitioning>)transitionContext{ return 1.0f; } - (void)animateTransition:(id <UIViewControllerContextTransitioning>)transitionContext{ ... [transitionContext completeTransition:YES]; }
|
- (void)animateTransition:(id <UIViewControllerContextTransitioning>)transitionContext中的 transitionContext ,我们可以获得:
源控制器即来自哪个视图控制器:
1
| UIViewController *src = [transitionContext viewControllerForKey:UITransitionContextFromViewControllerKey];
|
目标控制器,这里是B控制器:
1
| UIViewController *dest = [transitionContext viewControllerForKey:UITransitionContextToViewControllerKey];
|
容器视图:
1
| UIView *containerView = [transitionContext containerView];
|
使用 pushViewController 方式:从 A 控制器 push 到 B 控制器
因为是从 A 控制器 push 到 B 控制器,我们不需要实现 UIViewControllerTransitioningDelegate 中的方法,我们需要:
- 在 A 控制器设置
UINavigationDelegate 为 self
- 实现
UINavigationDelegate
- 实现
UIViewControllerAnimatedTransitioning 协议
实现 UINavigationDelegate 中的方法:
1 2 3 4
| - (id <UIViewControllerAnimatedTransitioning>)navigationController:(UINavigationController *)navigationController animationControllerForOperation:(UINavigationControllerOperation)operation fromViewController:(UIViewController *)fromVC toViewController:(UIViewController *)toVC;
|
返回的是一个实现了 UIViewControllerAnimatedTransitioning 协议的类实例。这个和 presentViewController 方式一样。
交互式视图控制器过渡
要实现一个交互式视图控制器过渡,除了要是上面的动画外,还要告诉交互控制器动画完成了多少,我们只要知道完成了多少百分比,告诉系统,系统就直接给咱们处理了。通过计算手势/动作事件或其他驱动过渡的事件,可以得出百分比。例如通过 UIScreenEdgePanGestureRecognizer 边缘返回手势,我们可以通过平移量来查看返回完成了多少。
视图控制器过渡方式还是要分成 2 种:
presentViewController 方式pushViewController 方式
使用 presentViewController 方式
除了上面 presentViewController 方式实现的协议方法外,我们还需要实现 UIViewControllerTransitioningDelegate 中的另外两个方法:
1 2 3
| - (id <UIViewControllerInteractiveTransitioning>)interactionControllerForPresentation:(id <UIViewControllerAnimatedTransitioning>)animator; - (id <UIViewControllerInteractiveTransitioning>)interactionControllerForDismissal:(id <UIViewControllerAnimatedTransitioning>)animator;
|
交互控制器实现了 UIViewControllerInteractiveTransitioning 协议。交互式过渡的交互控制器都必须是 UIPercentDrivenInteractiveTransition 实例或者 UIPercentDrivenInteractiveTransition 子类实例。
UIPercentDrivenInteractiveTransition 中以下方法可以完成交互过渡:
1 2 3
| - (void)updateInteractiveTransition:(CGFloat)percentComplete; - (void)cancelInteractiveTransition; - (void)finishInteractiveTransition;
|
例如我们给 B 控制器(A 控制器 present to B控制器),B 控制器通过缩放到达 A 控制器,我们给B控制器视图添加了一个缩放手势 UIPinchGestureRecognizer。
上面的 UIViewControllerTransitioningDelegate 我们返回一个 [[UIPercentDrivenInteractiveTransition alloc] init] 实例 percentDrivenInteractiveTransition 。
1 2 3 4 5 6 7 8 9 10 11 12 13 14 15 16 17 18 19 20 21 22 23 24 25
| - (void)pinchGestureAction:(UIPinchGestureRecognizer*) gestureRecognizer { CGFloat scale = gestureRecognizer.scale; if(gestureRecognizer.state == UIGestureRecognizerStateBegan) { self.percentDrivenInteractiveTransition = [[UIPercentDrivenInteractiveTransition alloc] init]; self.startScale = scale; [self.controller dismissViewControllerAnimated:YES completion:nil]; } else if (gestureRecognizer.state == UIGestureRecognizerStateChanged) { CGFloat completePercent = 1.0 - (scale/self.startScale); [self updateInteractiveTransition:completePercent]; } else if (gestureRecognizer.state == UIGestureRecognizerStateEnded) { if(gestureRecognizer.velocity >= 0){ [self cancelInteractiveTransition]; } else { [self finishInteractiveTransition]; } self.percentDrivenInteractiveTransition = nil; } if(gestureRecognizer.state == UIGestureRecognizerStateCancelled) { [self cancelInteractiveTransition]; self.percentDrivenInteractiveTransition = nil; } }
|
使用 pushViewController 方式
和 present 方式不同的一点是,我们使用 UINavigationDelegate 中的:
1 2
| - (id <UIViewControllerInteractiveTransitioning>)navigationController:(UINavigationController *)navigationController interactionControllerForAnimationController:(id <UIViewControllerAnimatedTransitioning>) animationController
|
来代替:
1 2 3
| - (id <UIViewControllerInteractiveTransitioning>)interactionControllerForPresentation:(id <UIViewControllerAnimatedTransitioning>)animator; - (id <UIViewControllerInteractiveTransitioning>)interactionControllerForDismissal:(id <UIViewControllerAnimatedTransitioning>)animator;
|
其他的都一样。
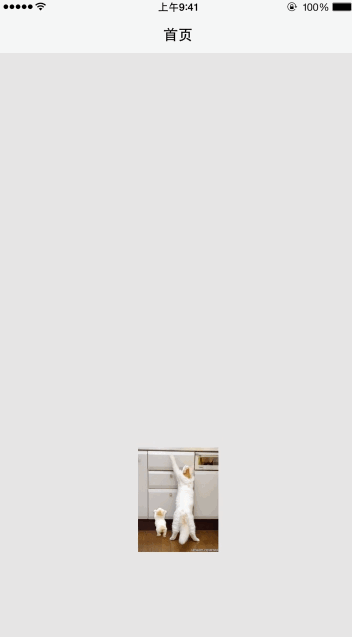
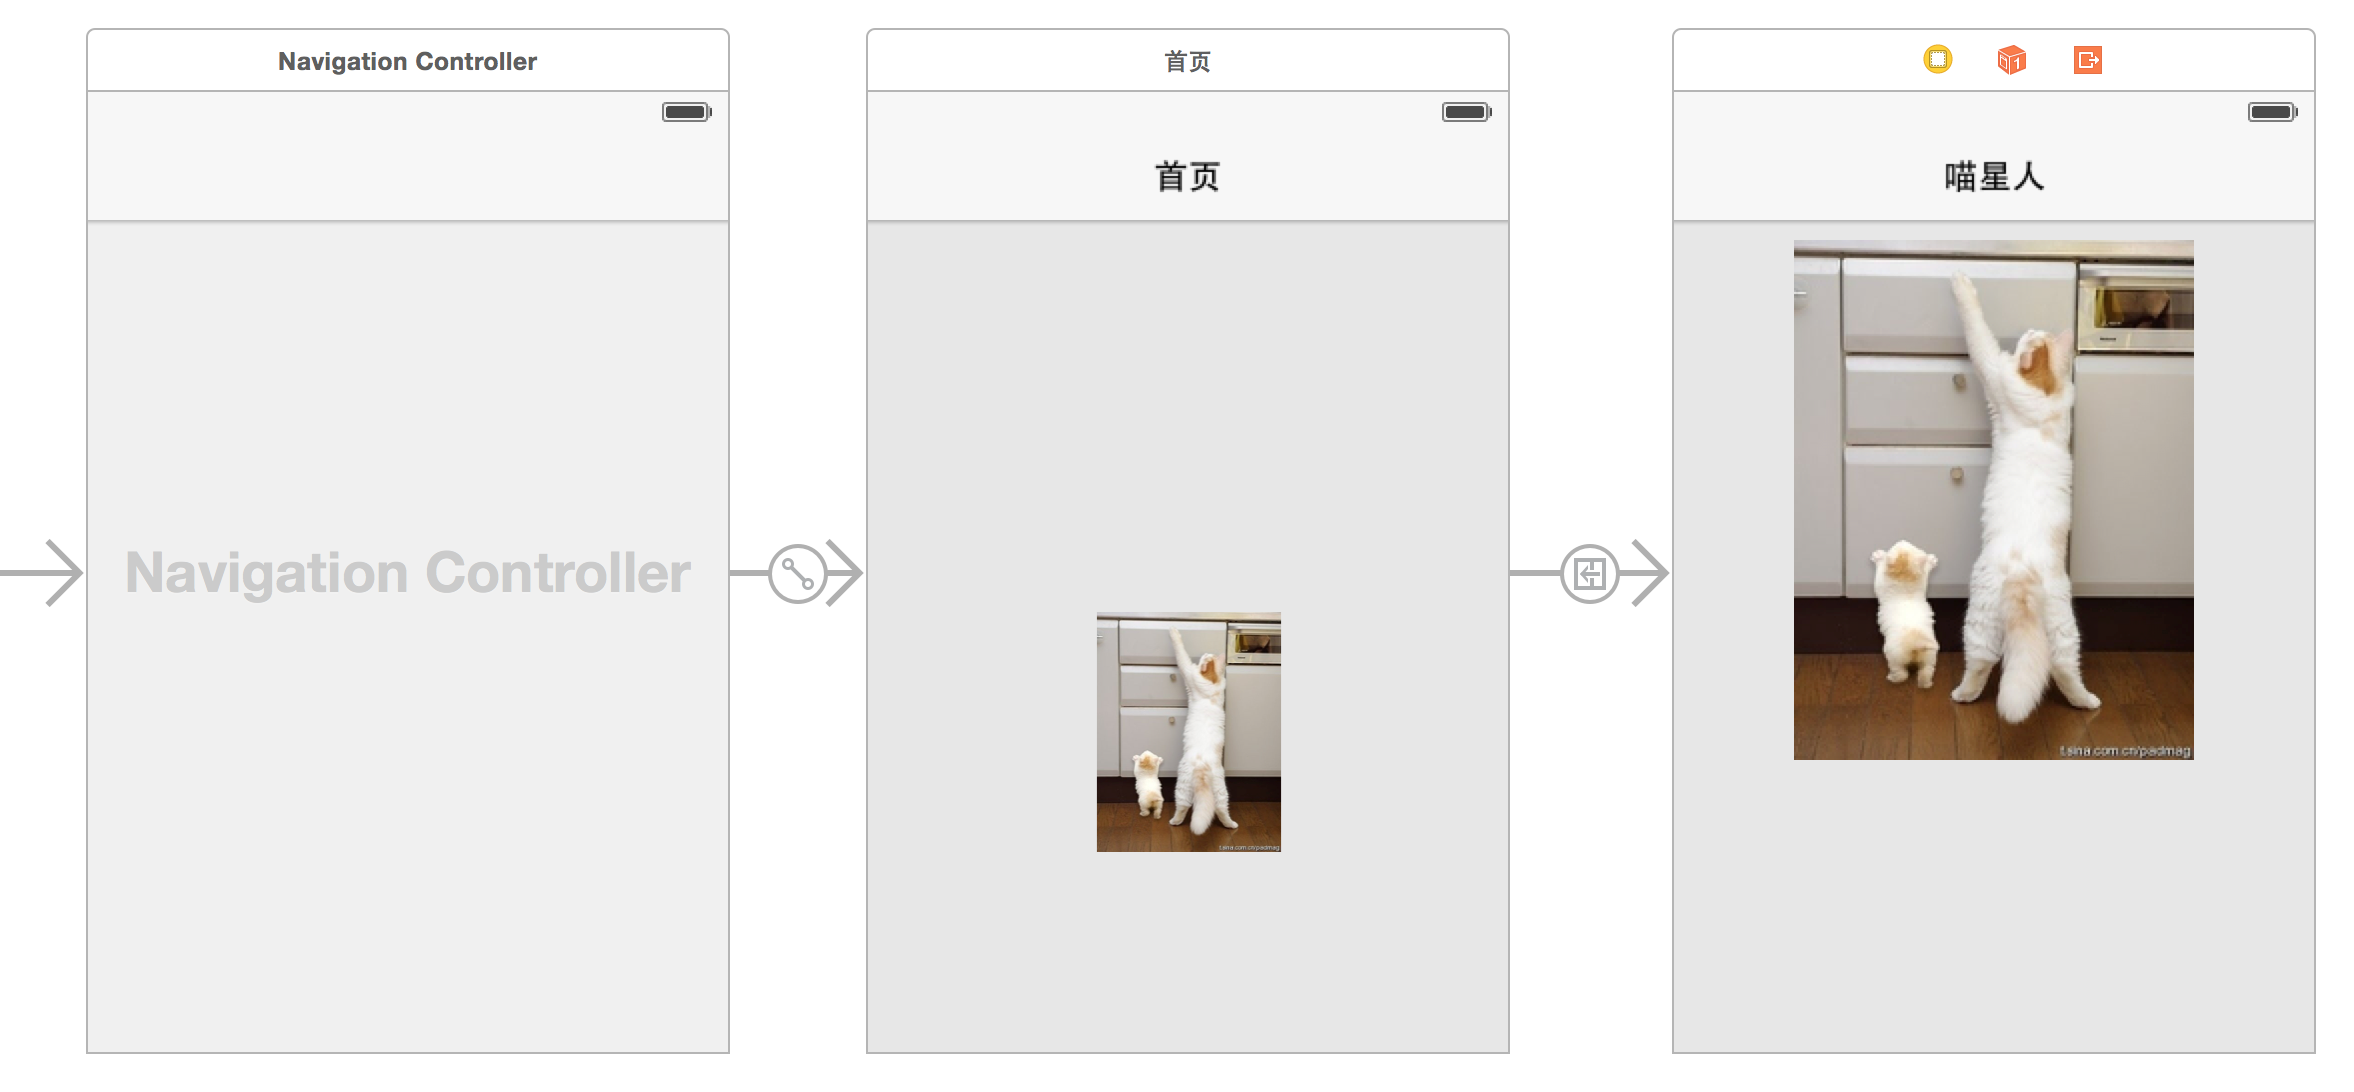
一个完整的例子
单击图片展示大图,返回慢慢缩放到小图,效果如下:
将用到:
- UINavigationDelegate
- 返回手势
- 交互式过渡效果
新建 2 个控制器
- 首页:
IYMFirstViewController
- 喵星人:
IYMSecondViewController
使用 Storyboard 创建两个视图
设置 UINavigationDelegate
IYMFirstViewController.m IYMSecondViewController.m 分别重写以下方法:
1 2 3 4 5 6 7 8 9 10 11 12 13 14 15
| - (void)viewDidAppear:(BOOL)animated { [super viewDidAppear:animated]; self.navigationController.delegate = self; } - (void)viewWillDisappear:(BOOL)animated { [super viewWillDisappear:animated]; if (self.navigationController.delegate == self) { self.navigationController.delegate = nil; } }
|
实现 UINavigationDelegate
IYMFirstViewController.m 中:
1 2 3 4 5 6 7 8 9 10 11
| - (id <UIViewControllerAnimatedTransitioning>)navigationController:(UINavigationController *)navigationController animationControllerForOperation:(UINavigationControllerOperation)operation fromViewController:(UIViewController *)fromVC toViewController:(UIViewController *)toVC{ if (fromVC == self && [toVC isKindOfClass:[IYMSecondViewController class]]) { return self; }else { return nil; } }
|
IYMSecondViewController.m
1 2 3 4 5 6 7 8 9 10 11 12 13 14 15
| - (id <UIViewControllerInteractiveTransitioning>)navigationController:(UINavigationController *)navigationController interactionControllerForAnimationController:(id <UIViewControllerAnimatedTransitioning>) animationController{ return _percentDrivenInteractiveTransition; } - (id <UIViewControllerAnimatedTransitioning>)navigationController:(UINavigationController *)navigationController animationControllerForOperation:(UINavigationControllerOperation)operation fromViewController:(UIViewController *)fromVC toViewController:(UIViewController *)toVC{ if (fromVC == self && [toVC isKindOfClass:[IYMFirstViewController class]]) { return self; } else { return nil; } }
|
其中 _percentDrivenInteractiveTransition 是一个 UIPercentDrivenInteractiveTransition 实例,在边缘手势中实例化。
实现 UIViewControllerAnimatedTransitioning
IYMFirstViewController.m
1 2 3 4 5 6 7 8 9 10 11 12 13 14 15 16 17 18 19 20 21 22 23 24 25 26 27 28 29 30 31 32 33 34
| - (NSTimeInterval) transitionDuration:(id<UIViewControllerContextTransitioning>)transitionContext { return 0.3f; } - (void)animateTransition:(id <UIViewControllerContextTransitioning>)transitionContext { IYMFirstViewController *fromViewContrroller = (IYMFirstViewController *)[transitionContext viewControllerForKey:UITransitionContextFromViewControllerKey]; IYMSecondViewController *toViewController = (IYMSecondViewController *)[transitionContext viewControllerForKey:UITransitionContextToViewControllerKey]; UIView *containerView = [transitionContext containerView]; UIView *snapshotView = [fromViewContrroller.bottomImageView snapshotViewAfterScreenUpdates:NO]; CGRect snapshotViewFromRect = [containerView convertRect:fromViewContrroller.bottomImageView.frame fromView:fromViewContrroller.view]; snapshotView.frame = snapshotViewFromRect; toViewController.view.frame = [transitionContext finalFrameForViewController:toViewController]; toViewController.view.alpha = 0; [containerView addSubview:toViewController.view]; [containerView addSubview:snapshotView]; fromViewContrroller.bottomImageView.hidden = YES; toViewController.topImageView.hidden = YES; CGRect snapshotViewToRect = [containerView convertRect:toViewController.topImageView.frame fromView:toViewController.view]; [UIView animateWithDuration:0.3 animations:^{ toViewController.view.alpha = 1; snapshotView.frame = snapshotViewToRect; } completion:^(BOOL finished) { if (finished) { [snapshotView removeFromSuperview]; fromViewContrroller.bottomImageView.hidden = NO; toViewController.topImageView.hidden = NO; [transitionContext completeTransition:!transitionContext.transitionWasCancelled]; } }]; }
|
IYMSecondViewController.m
1 2 3 4 5 6 7 8 9 10 11 12 13 14 15 16 17 18 19 20 21 22 23 24 25 26 27 28 29 30 31 32 33 34
| - (NSTimeInterval) transitionDuration:(id<UIViewControllerContextTransitioning>)transitionContext { return 0.3f; } - (void)animateTransition:(id <UIViewControllerContextTransitioning>)transitionContext { IYMSecondViewController *fromViewController = (IYMSecondViewController *)[transitionContext viewControllerForKey:UITransitionContextFromViewControllerKey]; IYMFirstViewController *toViewController = (IYMFirstViewController *)[transitionContext viewControllerForKey:UITransitionContextToViewControllerKey]; UIView *containerView = [transitionContext containerView]; UIView *snapshotView = [fromViewController.topImageView snapshotViewAfterScreenUpdates:NO]; CGRect snapshotViewFromRect = [containerView convertRect:fromViewController.topImageView.frame fromView:fromViewController.view]; snapshotView.frame = snapshotViewFromRect; // Setup the initial view states toViewController.view.frame = [transitionContext finalFrameForViewController:toViewController]; toViewController.view.alpha = 0; [containerView insertSubview:toViewController.view belowSubview:fromViewController.view]; [containerView addSubview:snapshotView]; fromViewController.topImageView.hidden = YES; toViewController.bottomImageView.hidden = YES; CGRect snapshotViewToRect = [containerView convertRect:toViewController.bottomImageView.frame fromView:toViewController.view]; [UIView animateWithDuration:0.3 animations:^{ toViewController.view.alpha = 1; snapshotView.frame = snapshotViewToRect; } completion:^(BOOL finished) { if (finished) { [snapshotView removeFromSuperview]; fromViewController.topImageView.hidden = NO; toViewController.bottomImageView.hidden = NO; // Declare that we've finished [transitionContext completeTransition:!transitionContext.transitionWasCancelled]; } }]; }
|
为 IYMSecondViewController 添加边缘返回手势
1 2 3
| UIScreenEdgePanGestureRecognizer *screenEdgePanGestureRecognizer = [[UIScreenEdgePanGestureRecognizer alloc] initWithTarget:self action:@selector(handleScreenEdgePanGesture:)]; screenEdgePanGestureRecognizer.edges = UIRectEdgeLeft; [self.view addGestureRecognizer:screenEdgePanGestureRecognizer];
|
1 2 3 4 5 6 7 8 9 10 11 12 13 14 15 16 17 18 19 20
| - (void) handleScreenEdgePanGesture:(UIScreenEdgePanGestureRecognizer *) recognizer { CGFloat progress = [recognizer translationInView:self.view].x / (self.view.bounds.size.width * 1.0); progress = MIN(1.0, MAX(0.0, progress)); if (recognizer.state == UIGestureRecognizerStateBegan) { _percentDrivenInteractiveTransition = [[UIPercentDrivenInteractiveTransition alloc] init]; [self.navigationController popViewControllerAnimated:YES]; }else if (recognizer.state == UIGestureRecognizerStateChanged) { [_percentDrivenInteractiveTransition updateInteractiveTransition:progress]; }else if (recognizer.state == UIGestureRecognizerStateEnded || recognizer.state == UIGestureRecognizerStateCancelled) { if (progress > 0.5f) { [_percentDrivenInteractiveTransition finishInteractiveTransition]; }else{ [_percentDrivenInteractiveTransition cancelInteractiveTransition]; } _percentDrivenInteractiveTransition = nil; } }
|
